Ubuntu Lucid(10.04) originally ships with 2.6.32 kernel. But on my T420 thinkpad, the wireless card is not recognized and graphics card is not functional well. Then I switched to 2.6.38 backport kernel, and installed bumblebee package to utilize the Nvidia Optimus Technology. Now the 3.0.0-16 backport kernel is out, it contains the fix for “rework ASPM disable code”, and it should do a better job in power saving even using the discrete Nvidia card. Moreover, it’s the new LTS kernel, so I decided to update to the 3.0 kernel. Please follow the steps if you are interested:
These commands install official nvidia driver. Currently, it’s the 295.20 version.
2. Enable Nvidia Driver
1
# sudo update-alternatives --config gl_conf
This will let you to choose opengl engines. Select nvidia over mesa. This will also enable nvidia Xorg drivers, blacklist nouveau driver and add nvidia-xconfig into /usr/bin. You may find warnings like:
1
2
update-alternatives: warning: skip creation of /usr/lib32/vdpau/libvdpau_nvidia.so.1 because associated file /usr/lib32/nvidia-current/vdpau/libvdpau_nvidia.so.1 (of link group gl_conf) doesn't exist.
update-alternatives: warning: skip creation of /usr/lib32/libvdpau_nvidia.so because associated file /usr/lib32/nvidia-current/vdpau/libvdpau_nvidia.so (of link group gl_conf) doesn't exist.
Just ignore them, seems to be safe.
1
# sudo nvidia-xconfig
This will generate new /etc/X11/xorg.conf file for your Nvidia card. If you cannot find the command, the original location is: /usr/lib/nvidia-current/bin/nvidia-xconfig
3. Fix ld Bindings
1
# echo "/usr/lib/nvidia-current/tls" | sudo tee -a /etc/ld.so.conf.d/GL.conf > /dev/null
This just add an ld path into /etc/ld.so.conf.d/GL.conf, otherwise, glx module cannot be loaded correctly. Here’s the /etc/log/Xorg.0.log segments:
1
2
3
4
5
6
(II) LoadModule: "glx"
(II) Loading /usr/lib/xorg/extra-modules/libglx.so
dlopen: libnvidia-tls.so.295.20: cannot open shared object file: No such file or directory
(EE) Failed to load /usr/lib/xorg/extra-modules/libglx.so
(II) UnloadModule: "glx"
(EE) Failed to load module "glx" (loader failed, 7)
Now, update ld runtime bindings and reboot.
1
2
# sudo ldconfig
# sudo reboot
4. Verify
1
2
# sudo apt-get install mesa-utils
# glxinfo | grep -i opengl
If your installation is successful, the output looks like:
1
2
3
4
5
OpenGL vendor string: NVIDIA Corporation
OpenGL renderer string: NVS 4200M/PCIe/SSE2
OpenGL version string: 4.2.0 NVIDIA 295.20
OpenGL shading language version string: 4.20 NVIDIA via Cg compiler
OpenGL extensions:
After installing the driver, hedgewars shows 120fps. While it used to show 4fps. It’s a great improvement. 🙂
By default, You need to guide Vim to decode double-byte encodings like GBK and Big5. The default Vim configuration only works well with Unicode encodings including utf-8, utf-16, utf-16be etc..Edit your .vimrc file, add line like:
1
set fileencodings=ucs-bom,utf-8,gbk,big5,latin1
Now Vim is able to detect and decode GBK and Big5 encodings automatically. And according my experience, Vim respects utf-16 and utf-16be files only they have BOM byes. Otherwise, these files are wrongly decoded. In this case, you may want to manually reopen the file using a correct encoding. The Vim command like:
1
:e ++enc=<your_encoding>
And Vim does not store BOM when saving by default. To enable/disable BOM saving, use:
1
2
:set bomb
:set nobomb
I’ve attached a series of text files to learn the usage. These text file all contains string “123你好”, but saved in different encodings. Let’s list their code points first:
The objective of this article is to make Vim your programmer’s editor.
First, a normal version of Vim should be installed to enable syntax highlighting. The default installation of Ubuntu 10.04 only contains a compact version “vim-tiny”:
1
# sudo apt-get install vim
Then copy a local vim configure file:
1
2
# cp /etc/vim/vimrc ~/.vimrc
# vi ~/.vimrc
1. Line Number
Add line into the .vimrc file:
1
set number
A similar command can be used to show/hide line number when editing on the fly:
1
2
:set number
:set nonumber
Related help:
1
2
:help set
:help 'number'
2. Tab-space Conversion
From the Vim help:
'tabstop' 'ts'          number  (default 8)
                        local to buffer
        Number of spaces that a  in the file counts for.  Also see
        |:retab| command, and 'softtabstop' option.

        Note: Setting 'tabstop' to any other value than 8 can make your file
        appear wrong in many places (e.g., when printing it).

        There are four main ways to use tabs in Vim:
        1. Always keep 'tabstop' at 8, set 'softtabstop' and 'shiftwidth' to 4
           (or 3 or whatever you prefer) and use 'noexpandtab'.  Then Vim
           will use a mix of tabs and spaces, but typing  and  will
           behave like a tab appears every 4 (or 3) characters.
        2. Set 'tabstop' and 'shiftwidth' to whatever you prefer and use
           'expandtab'.  This way you will always insert spaces.  The
           formatting will never be messed up when 'tabstop' is changed.
        3. Set 'tabstop' and 'shiftwidth' to whatever you prefer and use a
           |modeline| to set these values when editing the file again.  Only
           works when using Vim to edit the file.
        4. Always set 'tabstop' and 'shiftwidth' to the same value, and
           'noexpandtab'.  This should then work (for initial indents only)
           for any tabstop setting that people use.  It might be nice to have
           tabs after the first non-blank inserted as spaces if you do this
           though.  Otherwise aligned comments will be wrong when 'tabstop' is
           changed.
I will choose to use the 2nd approach, so add:
1
2
3
set expandtab
set tabstop=4
set shiftwidth=4
The auto-indent feature is also useful:
1
set autoindent
When setting expandtab, a real tab can be input by <Ctrl-v>_<Tab>
Related help:
1
2
3
4
5
:help autoindent
:help expandtab
:help tabstop
:help shiftwidth
:help retab
3. Option ‘modeline’:
If you start editing a new file, and the ‘modeline’ option is on, a number of lines at the beginning and end of the file are checked for modelines. This is simply enabled by adding:
1
set modeline
Your C/C++ comment may look like one of the following:
C++
1
2
/* vi: set ai ts=4 sw=4: */
/* vim: set ai et ts=4 sw=4: */
And likely, the Python comments:
Python
1
2
# vi: set ai ts=4 sw=4:
# vim: set ai et ts=4 sw=4:
Here, ai, et, ts and sw are just abbreviations. And expandtab is an option only in Vim, not Vi.
Read related help by typing:
1
:help modeline
4. Using Taglist:
There are lots of useful scripts in the Vim website that we can use. But Actually, Ubuntu repository also has some of them included:
After installation, these scripts are just downloaded, but not installed for your Vim. We list available script by typing:
1
# vim-addons
Output on Lucid 10.04:
1
2
3
4
5
6
7
8
9
10
11
12
13
14
15
16
17
18
19
20
21
22
23
24
25
26
27
28
29
30
31
32
33
34
35
36
# Name User Status System Status
align removed removed
alternate removed removed
bufexplorer removed removed
calendar removed removed
closetag removed removed
colors sampler pack removed removed
detectindent removed removed
doxygen-toolkit removed removed
editexisting removed removed
enhanced-commentify removed removed
gnupg removed removed
info removed removed
justify removed removed
lbdbq removed removed
markdown-syntax removed removed
matchit removed removed
minibufexplorer removed removed
nerd-commenter removed removed
omnicppcomplete removed removed
po removed removed
project removed removed
python-indent removed removed
secure-modelines removed removed
snippetsEmu removed removed
sokoban removed removed
supertab removed removed
surround removed removed
taglist removed removed
tetris removed removed
utl removed removed
vcscommand removed removed
vimplate removed removed
whatdomain removed removed
winmanager removed removed
xmledit removed removed
The Taglist plugin is described here, while OmniCppComplete plugin in next section. Both of them make use of ctags utility. Install it first:
1
# sudo apt-get install exuberant-ctags
Now install the Taglist plugin to your Vim:
1
# vim-addons install taglist
When editing a supported file type, Show the taglist window can be opened by one of the following:
1
2
3
:Tlist
:TlistOpen
:TlistToggle
Move your cursor between windows by <Ctrl-w>_w as usual. You may want to add a shortcut to toggle this feature. Add lines to your .vimrc file per official document:
1
2
nnoremap <silent> <F5> :TlistUpdate<CR>
nnoremap <silent> <F6> :TlistToggle<CR>
When your cursor hovers on a function, <Ctrl-]> takes you to its declaration, while <Ctrl-t> takes you back.
More help:
1
2
:help taglist-using
:help taglist-options
5. Using OmniCppComplete:
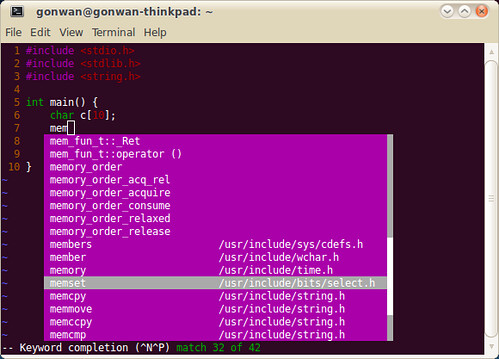
Vim include basic support for code completion. The simplest way is to use <Ctrl-p>. Vim will search your include headers and do insertion. See the screenshot:
The include search path can be set by:
1
:set path <your_path>
More help info:
1
2
:help 'complete'
:help ins-completion
Next, Vim provides basic C language completion using ctags. No C++ is supported. Additional languages script can be found in Vim’s autoload directory, say /usr/share/vim/vim72/autoload. But you should generate necessary ctags index files first. For libc6 header files:
let OmniCpp_ShowPrototypeInAbbr = 1 " function parameters
let OmniCpp_MayCompleteScope = 1 " autocomplete after ::
let OmniCpp_DefaultNamespaces = ["std", "_GLIBCXX_STD"] " see :help omnicpp-faq
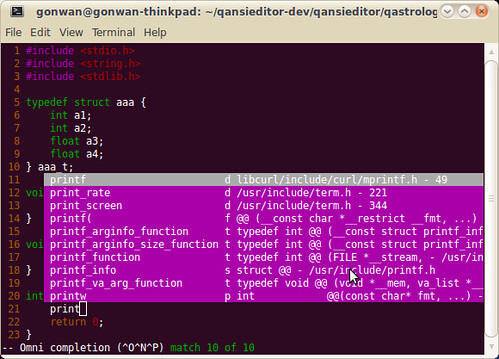
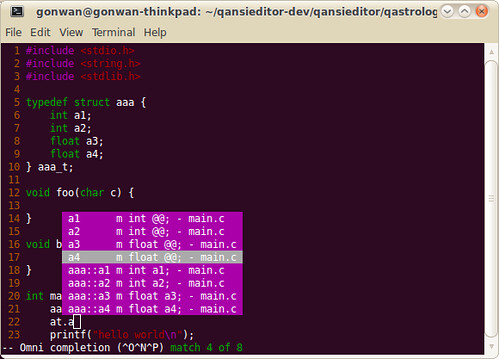
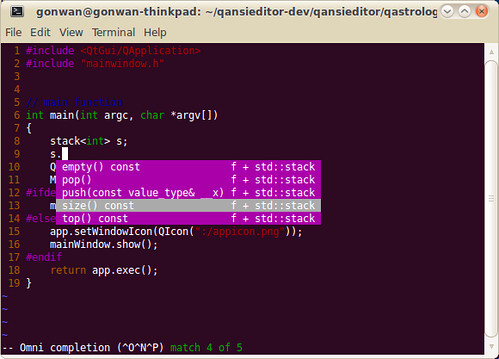
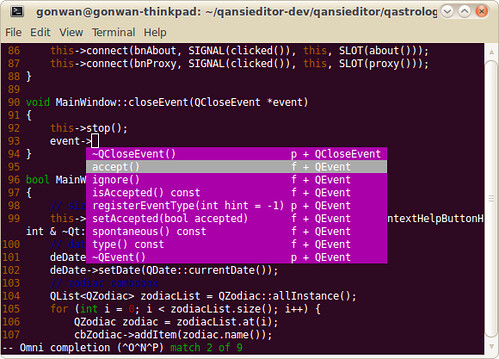
You may encounter problems when completing STL functions. Refer to :help omnicpp-faq and find the solution. Anyway, it works all good for me. Here’re screenshots showing STL and Qt code completion:
!!!NOTE!!! : The tags file for current file must be generated for OmniCppComplete to work. I’ve set Ctrl+F12 as the accelerate key. Otherwise, you’ll get “Pattern not found” error. More help:
1
2
:help omnicpp-options
:help omnicpp-features
Finally, the list of lines adding to my .vimrc file:
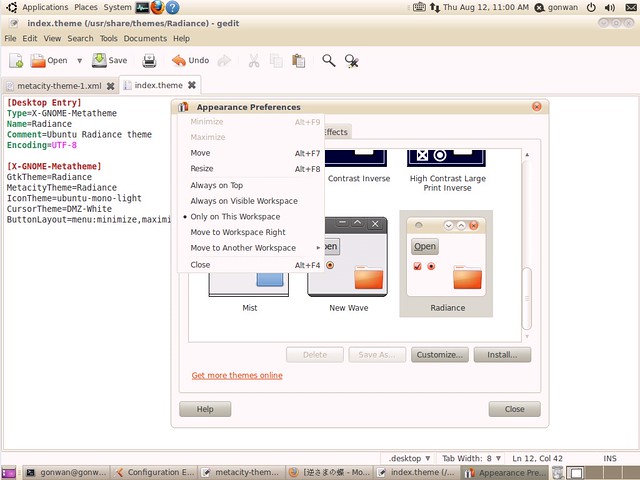
This will set your window button order. And every time you switch to “Radiance” theme, no confirm dialog will prompt to tell that the button order will be changed. Then:
Search “menu_focused_normal”, there are four lines regarding graphics drawing of menu: “menu_focused_normal”, “menu_focused_prelight”, “menu_unfocused_prelight”, “menu_unfocused_prelight”. Add first line into “menu_focused_*” and remove the image tag, and use second line to replace the image tag in “menu_unfocused_*” too.