From wikipedia http://en.wikipedia.org/wiki/WebDAV:

Web-based Distributed Authoring and Versioning (WebDAV) is a set of methods based on the Hypertext Transfer Protocol (HTTP) that facilitates collaboration between users in editing and managing documents and files stored on World Wide Web servers. WebDAV was defined in RFC 4918 by a working group of the Internet Engineering Task Force (IETF).

The WebDAV protocol makes the Web a readable and writable medium, in line with Tim Berners-Lee’s original vision. It provides a framework for users to create, change and move documents on a server (typically a web server or “web share”). The most important features of the WebDAV protocol include:

  • locking (“overwrite prevention”)
  • properties (creation, removal, and querying of information about author, modified date et cetera);
  • name space management (ability to copy and move Web pages within a server’s namespace)
  • collections (creation, removal, and listing of resources)

I used Apache to experience the WebDAV. The server was built and installed from source with:

The “prefix”, “layout”, “mpm” switch is not necessary, since these are the default values under Unix. Now modify the configure files to support WebDAV access:

The “var” and “uploads” directory, the “DAV-upload” realm, “user.passwd” file, “user” and “admin” user account are referred by “conf/extra/webdav.conf”. While the “daemon” user and group are referred by “conf/httpd.conf”.

Then modify “httpd.conf” to include “webdav.conf” the apache server. It a single include directive. Now start the apache server by running:

Our WebDAV directory is /uploads. So here’s the address on how to access it:
– In nautilus: dav://192.168.1.100/uploads
– In konquer: webdav://192.168.1.100/uploads
– In windows: Go to –> My Network Places –> Add a network place –> Internet or network address –> Enter (http://<user>:<password>@192.168.1.100/uploads) –> Finish!
最近看了这本<<The Apache Modules Book>>: http://www.amazon.com/gp/product/B000SEGRM8/, 记录一下.

每次我们学一个新的东西的时候, 似乎都会写一个程序叫做”hello world”, 今天的目的也在于此. 看这本书的目的主要是为了了解Apache 的扩展性到底是如何做到的. Apache 主要提供了hook, filter, provider 等机制. 其次, 就是Apache 的跨平台和平台相关的优化. 本人对这些东西的了解还比较粗浅, 本书感觉也只是在大量的贴Apache 的源码, 所以还是要看Apache 的manual. 最后, Apache 的源码确实写的非常有参考价值, 很多东西我都不知道原来能那么用的.

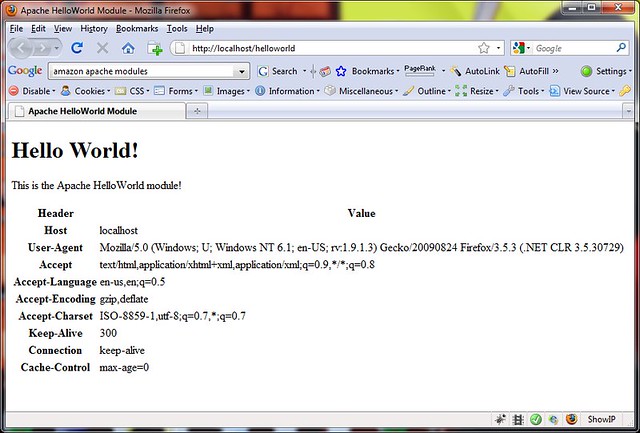
好了, 进正题, 我们要写的是一个”hello world” 的generator module. 运行的结果如图:

apache_1_1

然后是代码, 有点长:

这个module 的用途是打印接受到的request 的header 信息. 需要知道的有两部分: module 的声明, module 的hook 函数. Apache 模块的都是通过”module” 这个struct 来声明导出的, 在这个struct 中会初始化这个模块的各个函数指针. 在我们的代码中, 中间5 个值都是NULL, 它们是用来安装配置文件相关的hook 的, 暂时不用. 最后一个hook 则指向一个相当于运行时的hook 函数, 在这个函数, 即”helloworld_hooks” 中, 我们指定Apache 的那些处理过程会被我们hook 到. 这里我们使用了ap_hook_handler 这个函数, 它表明我们的模块是一个generator handler. 它的参数helloworld_handler 依然是一个函数指针, 表示具体的处理过程. 其它的代码都是html 的生成, 先随便看看吧.

接下来是编译的问题. 如果用VC 的话, 那么就是简单的把apache, apr, apr-util 的include 和lib 的路径加进去, 基本就通过编译了. 不过有的module 可能会依赖其它module, 个么这个也自己加. 我写了一个简单的Makefile 来编译, 如下:

vs2005, vs2008 皆可通过编译. vs 的-I 选项似乎不支持绝对路径, 所以编译之前请修改$(APACHE) 变量. 另外, 发现一个问题就是, debug 编译的Apache 不能加载release 编译的module. 后来发现是vs2005/2008 的CRT dll的SxS 的问题. 所以, Apache 和module 的编译器最好是同一版本和配置, 这样CRT 才能被正确加载进来. 或者就是静态链接到CRT.

把编译出来的*.so 文件拷贝到Apache 的modules 文件夹下. 最后来修改配置文件. 打开httpd.conf, 添加如下代码:

LoadModule 指令用来加载模块, 第一个参数是在代码中导出(export) 的模块名, 第二个参数是模块的路径. 然后来设置映射关系, 凡是URL 是/helloworld 开头的, 都用helloworld 这个handle 来处理, 而helloworld 这个handle, 实际上只是我们在代码中字符串比较用的, 参见helloworld_handler 这个函数.

以上.

1. Source

a) apache 2.2.13: http://www.apache.org/dist/httpd/httpd-2.2.13-win32-src.zip
b) zlib 1.2.3 (for mod_deflate): http://www.zlib.net/zlib-1.2.3.tar.gz
c) openssl 0.9.8k (for mod_ssl): http://www.openssl.org/source/openssl-0.9.8k.tar.gz

2. Tools

a) ActivePerl: http://aspn.activestate.com/ASPN/Downloads/ActivePerl/
b) awk & patch tools: http://gnuwin32.sourceforge.net/packages.html

3. Steps

a) Setup Perl environment, add %Perl%/bin to %PATH%.
b) Also add awk, path tools to %PATH%.
c) Decompress the apache source code to %Apache%, D:Apache maybe.
d) Decompress the zlib into srclib subdirectory named zlib.
e) Decompress the openssl into srclib subdirectory named openssl.
f) Now the source tree should look like:

g) Patch zlib:
Download the patch from: http://www.apache.org/dist/httpd/binaries/win32/patches_applied/zlib-1.2.3-vc32-2005-rcver.patch. This patch contains minor fixes and enable generation of *.pdb files.
Copy the patch file into zlib subdirectory, swith to the directory in cmd.exe and run the command:

h) Patch openssl:
Download the patch from: http://www.apache.org/dist/httpd/binaries/win32/patches_applied/openssl-0.9.8k-vc32.patch. This patch will correct a link issue with zlib and enable generation of *.pdb files.
Copy the patch file into openssl subdirectory, swith to the directory in cmd.exe and run the command:

i) Build zlib:

j) Build openssl:

k) Patch Apache:
There’s an issue in the Makefile.win that build Apache in 2.2.13: https://issues.apache.org/bugzilla/show_bug.cgi?id=47659. Download the patch against branch into the %Apache% directory and run the command:

l) Build Apache using command line:
Now you can buid Apache by:

And install Apache by:

m) Build Apache using Visual Studio 2005:
There’s also a flaw in the *.vcproj conversion of *.dsp through Visual Studio 2005. We must run a perl script to fix it first:

Now, everything are OK. In Visual Studio 2005, open the Apache.dsw and convert all *.dsp files to *.vcproj files. Then build the project “BuildBin”. The project “InstallBin” project will distribute all the project in the Apache solution.

4. Debugging with Visual Studio 2005

It’s quite simple. After build the project “InstallBin”, open the property page of the “httpd” project. Switch to “Debugging” tab, change the Command value into your binary of installed directory. Now, add breakpoints, and press F5 to start your tracing or debugging.

5. Reference

a) Compiling Apache for Microsoft Windows
b) Apache 2.2.9 command line build with the Windows 2008 SDK