Got a new EeePC 1015PX this week. I just installed the netbook version of Ubuntu 10.04.2 and all devices are recognized. Only some small tweaks are needed:

1. Add the partner repository

Go to System –> Administration –> Software Sources –> Other Softwares tab, check the partner repository. Then software like Sun’s JDK and Skype become available. Skype works fine with my webcam.

2. Tweak asus hotkeys

The volume and wireless hotkeys do not function by default. Here’s the official solution in wiki.

Find GRUB_CMDLINE_LINUX_DEFAULT parameter and modify it as follow:

Then update grub installation with the command and reboot:

Update Feb 17, 2012: acpi_backlight=vendor dims initial screen brightness, and make it difficult to adjust it later. Now I use acpi_backlight=video to avoid this.

3. Disable touchpad

It’s necessary to disable the touchpad while typing. It annoying because it’s always mis-clicked and cause input focus to move away. Many threads in forums discussed about this, but none works for me. The .32 kernel just recognizes the touchpad as a mouse, thus cannot be disabled. Then I just install the .35 kernel in the backport repository:

After reboot into the new kernel, run:

The touchpad finally recognized correctly. Then continue installation:

Go to Preference –> Touchpad, uncheck “Enable touchpad”.
Go to Preference –> Mouse –> Touchpad tab, uncheck “Disable touchpad while typing”. If this option is not disabled, your touchpad will be enabled after you type something.

Update Jul 15, 2011: Newer .32 kernels from 2.6.32-33 recognize the touchpad correctly. So if you use later versions or fresh install your ubuntu from 10.04.3, there’s no need to install .35 kernel.

4. Autohide top panel

I installed the netbook UI by:

There’s no autohide property in the context menu of top panel of the UI. I had to modify it manually:

5. Hide menu/bookmark bar in firefox

Too small content area in firefox by default. To hide bookmark bar, just find and uncheck the option in View menu. To hide menu bar, you need to install an extension called “Compact Menu 2”. It compacts the whole menu as a single button in navigation bar. In addition, you may also want to disable the “webfav” extension to make room.

6. Adjust screen panning

Some application is not netbook-friendly. Their windows are just to large, even beyond 1024×600. To view the whole window, you can set the logic resolution of your screen. And it scrolls when your mouse pointer reaches the border of the physical screen. First, find the output of your screen by:

The current output name may be VGA*, LVDS* or else. Then change your logic resolution of it like:

7. Tweak startup applications

Go to System –> Preferences –> Startup Applications, uncheck unnecessary items. For me, they are:

  • Evolution Mail Notifier (unused)
  • Print Queue Applet (unused)
  • Visual Assistance (unused)
  • Bluetooth Manager (no bluetooth device)
  • Maximus Window Management (no need to the feature)

8. Make Vim your text reader

I read novels in text files, I want to keep track of the last reading position automatically.

Search and uncomment the line as guided:

9. Switch between gcc versions

Sometimes, a specific version of gcc/g++ is needed to build a project. I simplify this by making use of the “update-alternative” utility. Suppose you have installed gcc-4.1 and gcc-4.4:

Then you can switch versions by:

Actually, other less used symbolic links also need configure like this. They are gcov, i486-linux-gnu-gcc, i486-linux-gnu-cpp.
This article borrows hugely from: http://labs.qt.nokia.com/2010/12/17/experimental-packages-for-symbian-development-on-linux/

First, there’s Qt SDK and Nokia Qt SDK. In a word, Qt SDK is for desktop development, while Nokia Qt SDK is for mobile development. A detailed comparison can be found here.

Then, there’s S60 SDK. Is it necessary to install it before developing symbian applications? The S60 SDK is only available under Windows platform. Under Windows, Nokia Qt SDK is an all-in-one package. It includes S60 SDK, Qt SDK, QtSimulator and a Symbian compiler. So, the AIO package is recommended. There’s another choice under Windows: S60 SDK + Qt for Symbian. The Symbian version can be found here. But this time, there’s no simulator.

As mentioned here, These two SDK will be merged in Nokia Qt SDK 1.1.

Now, we will have our Linux tutorial for Ubuntu.

1. Download and install the following packages (32-bit versions only):
* gcce-4.4.172-r1.deb
* s60-sdk-5.0.deb
* runonphone-4.7.1.deb
* qt-symbian-libs-4.7.1-r1.deb (Old version: qt-symbian-libs-4.7.1.deb)

2. Install App TRK on your phone. It’s a debug service. Find *.sisx files here. Check the TRKPackages.xml file to get correct version for your phone. For my C5-03, I used s60_5_0_app_trk_3_2_7.sisx.

3. Install Qt libs for Symbian. They can be found at Qt’s ftp site: ftp://ftp.qt.nokia.com/pub/qt/symbian/. I installed version 4.7.1 as the developing library. Here’s what exactly each *.sis package contains:

* fluidlauncher.sis
Contains around 10 different Qt demos. Depends on Qt and Open C.
* qt.sis
Contains the Qt libraries Symbian Signed for Nokia phones. Depends on Open C.
* qt_selfsigned.sis
A self-signed version of the above library. Works on other phones such as the Samsung i8910.
* qtwebkit.sis
Contains the QtWebKit library Symbian Signed for Nokia phones. Depends on Qt.
* qtwebkit_selfsigned.sis
A self-signed version of the above library. Works on other phones such as the Samsung i8910.
* qt_demos.sis
Contains qt.sis, qtwebkit.sis, fluidlauncher.sis and Open C all in one convenient package. No other dependencies.
* qt_installer.sis
Contains qt.sis, qtwebkit.sis and Open C all in one convenient package. No other dependencies.

Installing qt_installer.sis is enough.

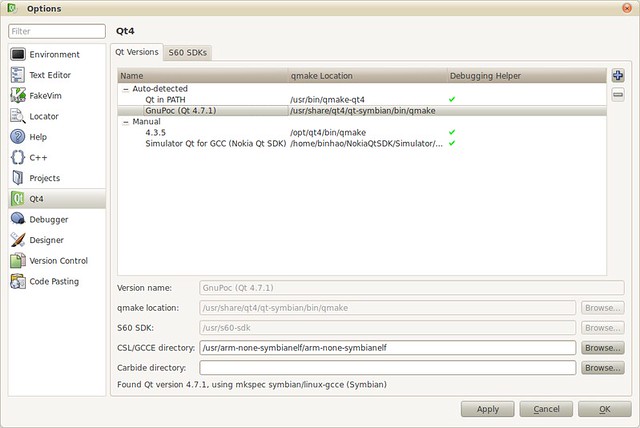
4. Configure your QtCreator, add QtSimulator and QtSymbian versions. The Qt4 page should be something like:

qt_symbian_1

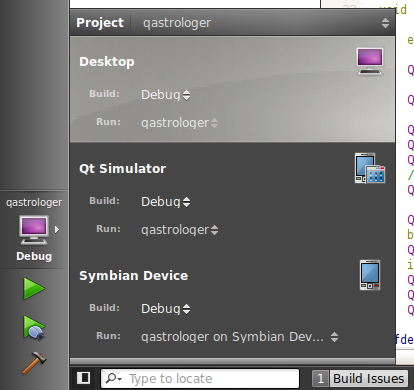
5. Now, create a simple GUI application and add desktop/simulator/device targets, so that you can run on all of them.
qt_symbian_2

6. Run on phone.

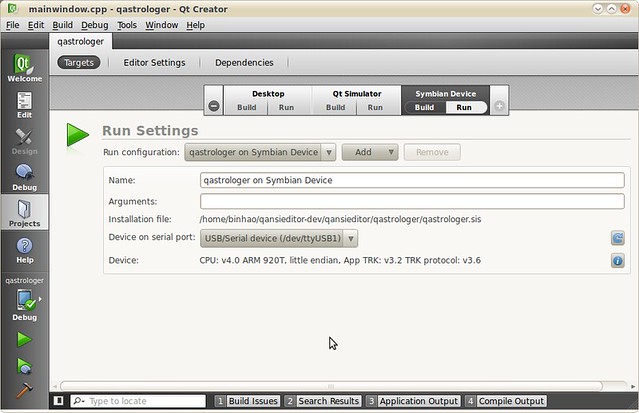
When App TRK is installed, connect the phone to the PC using the USB cable. Select “PCSuite” as connection type. Then run App TRK on the phone, and make sure that the connection type is USB. This can be changed under the Settings menu entry. If necessary, choose Connect from the menu.

On Linux, phone should appear as the /dev/ttyUSB1 device, however if you are running an old kernel, you may need to force the USB module to be loaded correctly before the device will appear:

Note the identifier on the line where your Symbian device appears. Then execute the following, using the first and second part of the identifier in place of XXX, respectively.

For my C5-03, It’s:

The rmmod step may fail if the module is not already loaded, but that is harmless.

In QtCreator, go to Projects –> Targets –> Symbian Device, refresh the serial port, select USB1 and connect to your phone.

qt_symbian_3

Congratulations! you’ve done. Select Symbian device as your target and click run button. This will package, deploy and run your application on your phone. Simple, Huhhh?

    This article applies to Ubuntu 8.04/10.04. I referred to the instruction here: http://ubuntuforums.org/showthread.php?t=51003. And I’ll use my qastrologer project to demo the building procedure.

1. Install build tool packages:

2. Get the source package, exact it into ~/packages/qastrologer. The directory structure should like: ~/packages/qastrologer/qastrologer-<version>/<source>. The <source> directory contains your *.pro file.

3. Add install section in *.pro file. Otherwise, the built package contains not binary:

I referred to the guild here: http://wiki.maemo.org/Packaging_a_Qt_application. For more information on how to use the INSTALLS macro, refer to the Qt document: http://doc.trolltech.com/4.7/qmake-environment-reference.html#installs

4. Run dh_make. This will create the basic debian package structure.

We are generating a single binary package and licensed with GPL. After running the command, a “debian” subdirectory is created. Now we need to fill in more useful infomations.

5. “rules” file:

It is the most important build script. The cdbs already have support for building QMake projects. Our “rules” file is simple:

Last line ensures we use Qt4. I referred to the source of minitube project. You can access it via:

6. “control” file:

This file controls build and binary dependency. For my qastrologer, the default values are enough. You may want to have some minor changes in “Section”/”Priority”/”Maintainer” values. Since I want to keep my package installs from 8.04 to 10.04 and above, I must specify the minimum dependencies manually to use Qt 4.3. So my “control” file looks like:

Note, the default “control” file uses “${shlibs:Depends}” and “${misc:Depends}” macros to generate binary dependencies automatically. Refer to the man page of debhelper to get more information.

7. Fill in “changelog” and “copyright” files.

8. Build the package:

For full build of the package (build source, deb, clean…) run:

Instead if you have a big package, you can also build only the deb file with:

From last blog, I’ve demostrated the usage of Ubuntu *-dbg packages. However, not all *-dbg packages seem to work as libssl0.9.8-dbg. For instance, libcurl3-dbg and libqt4-dbg packages do not work. I’m afraid some debug info are missing in these two packages. I’m not sure.

I googled a lot, but was not able to find a solution. So I decided to build the debug version of the two library myself. Here are steps for libcurl:

After all, the compiled binary is located in /home/gonwan/testgdb/curl-7.19.7/lib/.libs/. Note, this is a hidden folder.

Here comes our test code:

Build commands:

I use /usr/lib/libcurl.so.4 instead of lcurl, since lcurl will link the binary to /usr/lib/libcurl-gnutls.so.4. But I currently cannot afford it :(. Last, start our GDB:

It prints the backtrace now, though I’m not so accustomed to console debugging. I add the LD_LIBRARY_PATH environment to let our test program find our homemade version of libcurl.so.4. In fact, we can run ldd like following lines. You see the re-direction?

Later, I successfully made it possible to debug Qt source code in IDE. I chose QtCreator, since it has both windows and linux version, and it’s easy to install and configure. I also built my homemade version of Qt:

I only built the most common modules, excluding webkit, script, xmlpatterns, phonon, multimedia and declarative modules. It took only 25 minutes to finish (An entire build under windows may take 3 – 4 hours.). After all, start your QtCreator, create a Qt console project with the source below:

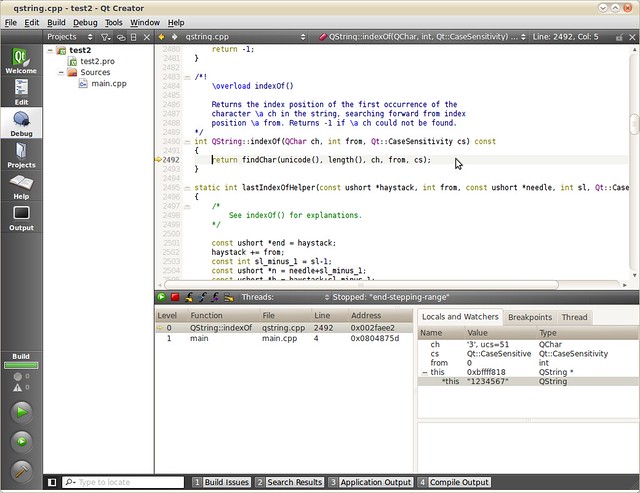
Build the project in debug mode. And now, here’s the magic: Go to Project tab –> Run Settings –> Run Environment, append our homemade Qt library path to LD_LIBRARY_PATH. In my example, it’s /home/gonwan/testgdb/qt4-x11-4.6.2/lib. Ok, you’re almost done! Go back to the Edit tab, set a breakpoint at line 4 (or line 3 as you like), press F5 to start debugging the project. Then continue pressing F11, you will find GDB has stepped into Qt source code! Let me take a screenshot:

qtcreator_qt4debug

In order to load our homemade *.so, we can also run “make install”.

I will use openssl library as example. Here’s a simplest source:

Now build and start your GDB, note the ‘-g’ option is necessary:

GDB cannot step into openssl source code, since there’s no debug symbol found. In Ubuntu, we can install it using apt-get. I’m using Hardy(8.04):

Launch our GDB again:

Symbols are found, GDB prompt for missing source files! We can install by typing:

The source files will be downloaded and extracted in openssl-0.9.8g folder. Now we wanna attach the source files when debugging.

Oh! Everything works!