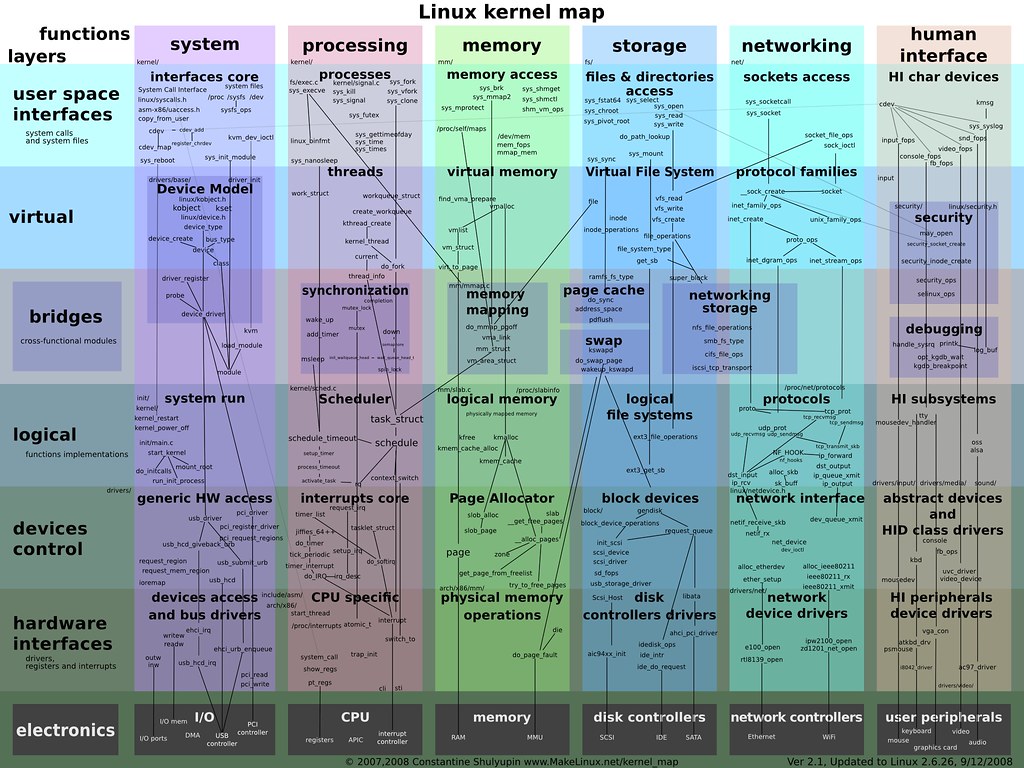
http://www.makelinux.net/kernel_map
我连这种圣经级的书都没看完, 请先bs 我.
大三的时候就买了书, 当时看得时候累的要死, 而且看了完全都忘记了. 现在再看, 好了不少.
本书以UP(Unified Process)为蓝本, 介绍了OOA/D(Object-Oriented Analysis/Design) 和UML 的相关概念. 按照UP 定义, 一个UP 项目可以划分为4个阶段(phase): 初始(inception), 细化(elaboration), 构建(construction), 移交(transition). 书里主要关注初始和细化阶段, 并把细化阶段分成了3个迭代(iteration).
最受益的是, 书中介绍的OOA 的部分, 以及OOA, OOD 如何过渡的部分. OOA 其实上课的时候说过很多, 但是不系统. 外国人写书就是这样, 很相似的概念可以花一大章节来辨明. 比如多次强调领域模型(domain model, 属于OOA中的概念) 和领域层(domain layer, 属于OOD中的概念) 中的类(class) 是不一样的. 中间还有一个低表示差异(low represental gap) 的概念, 以便前者触发(inspire)后者的设计.
关于设计模式, 之前就复习过那本经典的<<design pattern>>. 而读了这本书之后, 似乎找到了所有23 种GoF 模式的指导思想: 低耦合(low coupling), 高内聚(high cohesion).
书里关于细化的iteration-1, iteration-2 的内容花了很多时间来看, 而之后iteration-3 中所谓的高级内容却感觉很容易, 真搞笑. 虽然不敢说对于23 种GoF 模式都烂熟于胸, 但15, 16种总是有的吧. 以前在写jsp 网页的时候, 调用struts, hibernate 库(library)简直是顺理成章啊. 高级内容中就涉及到了这2 个框架(framework) 的设计. 还有就是用了不要用的3 层(layer)架构, 呵呵, 书里并没有说具体分多少层, 只说了分层的目的还是在于: 低耦合, 高内聚.
好了好了, 好像一点也不像笔记啊 = =b.
| Lacrimosa Kalafina 暗闇の中で睦み合う 君のくれた秘密を標に Lacrimosa 幻の馬車は闇を分け 空の上の無慈悲な神々には 僕らは燃えさかる薪となり Lacrimosa Lacrimosa…… |
Lacrimosa Kalafina 绝望与未来 你告诉我的秘密便是我的道标 Lacrimosa 幻影的马车冲破黑暗 天空之上冷酷无情的诸神 让我们化身为熊熊燃烧的薪柴 Lacrimosa Lacrimosa…… |
<<黑执事>> ED2.
Lacrimosa: 拉丁语, 流泪, 痛苦之意.
Just take a record. The purpose is to find a GDI+ replacement library.
a) CxImage
http://www.xdp.it/cximage.htm
Many image formats are supported. It can be used seamlessly under windows with SDK/MFC. Its main disadvantage is that its support for linux is poor. Version 6.0 does not have linux source packages. While with version 5.99, I can only use it to convert between image formats.
b) FreeImage
http://freeimage.sourceforge.net/
Like CxImage, is supports many image formats. Since it focus on image shift and manipulation, how to display a image under windows/linux is not issued. There IS a FAQ to tell windows user how to draw images using GDI. But images with alpha channel(like png) is not displayed normally.
c) ImageMagick
http://www.imagemagick.org/
A console application to manipulate images. It also provides API for programming, but not displaying.
d) cairo
http://cairographics.org/
It’s a powerful cross-platform graphics engine. GTK+ use it to render the majority of its widgets. Firefox and SWT/linux also use it. It can be used as a substantiation for GDI+ under windows. But image format support is limited. Only png can be loaded only with this library.
e) DevIL
http://openil.sourceforge.net/
Formerly known as “OpenIL” and takes role as a cross-platform image library. It has a high rating at sourceforge. However, I was not able to compile its samples using visual studio. They are broken maybe. Skip.
f) wxWidgets
http://wxwidgets.org/
I wonder why so many excellent image/graphics libraries have insufficient feature. Finally, I found that since a image will be display on a DC(Device Context in GDI) or GC(Graphics Context in X11), a cross-platform display media is also needed. Then I continued to search for light-weight cross-platform GUI libraries and turned to wxWidgets.
wxWidgets is simpler than Qt. It can display bmp/jpg/png/tiff images and fills my requirements.
g) Juce
http://www.rawmaterialsoftware.com/juce/index.php
It’s a surprise that I finally knew Juce. From Spy++ tool under windows, I found that all controls of the toolkit is drawn by self, say, they do not use native windows controls and do not have handles like Qt. But it’s much simpler than Qt and contains a UI designer to generate ready-to-compile C++ code. Here’s a demo I created with designer:
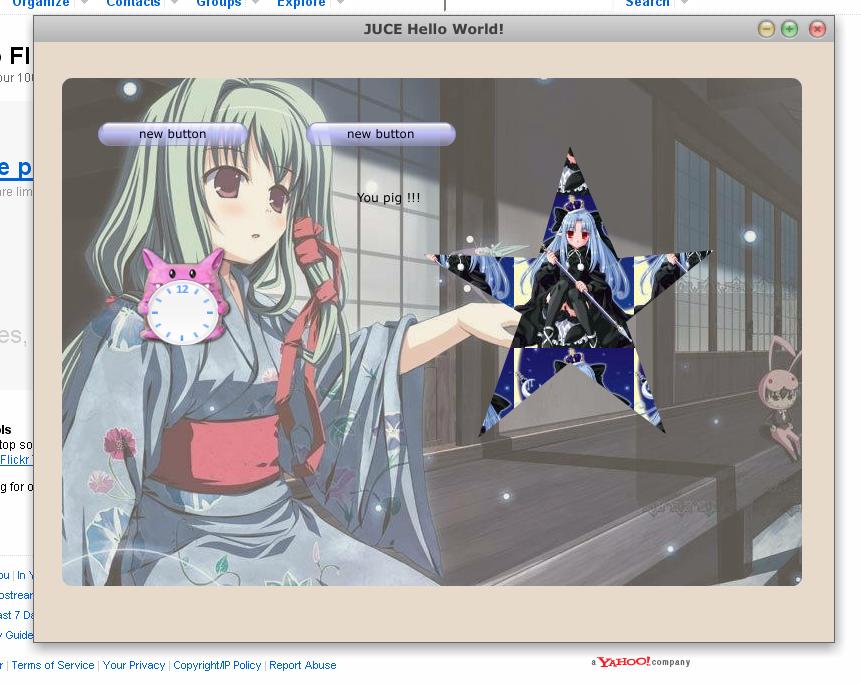
You may also see a shadow under the window like Macintosh 🙂
The only issue is that it has a GPL license. haha !
今天开始, 所有的技术文尽量全部用e 文! @@
I don’t really know the exact difference between “transparency” and “translucency”. But the flowing pictures of my running application may show you.
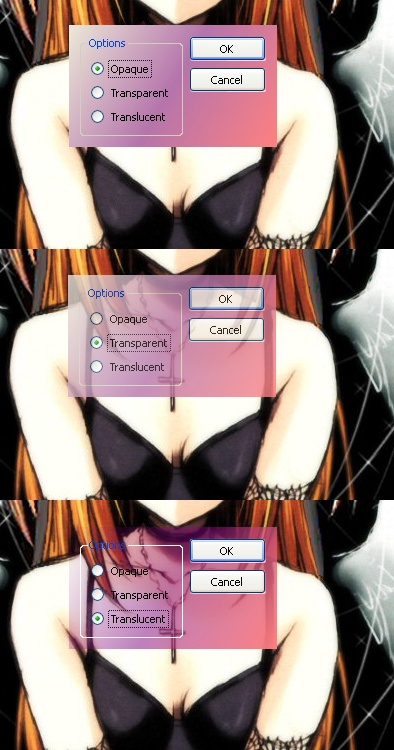
Pic-1 shows a normal dialog with gradient background filled. Pic-2 add opacity ability to the whole dialog(transparent). While Pic-3 only add opacity to the dialog’s background(per-pixel, translucency).
If you’re using windows sdk, there’s an API called “SetLayeredWindowAttributes” to realize the function in Pic-2. You can also call it with a transparency color key to make all pixels of this color to be transparent. But, how to realize the function in Pic-3? My dialog’s background is in gradient color. As mentioned here(in Chinese): To realize it, you must use an API called “UpdateLayeredWindow”. And it’s quite troublesome.
There are also GUI libraries to fill this requirements: 1) WPF, 2) Qt. My application is written in Qt. How do WPF and Qt implement this feature? By drawing all controls themselves. They do not use native windows controls. So if you do it yourself, what a big project !
Using Qt, I call QWidget::setWindowOpacity() to set whole transparency of a window(Pic-2). Qt 4.5 is just released. There’s a new translucency attribute in QWidget class. I use it to realize per-pixel alpha blending(Pic-3). Here’s Sample code:
|
1 2 3 4 5 6 |
void TransparentWindow::setTranslucent() { setWindowOpacity(1.0); setAttribute(Qt::WA_TranslucentBackground, true); repaint(); } |
The demo project can be found here. Note:
a) Make sure you have Qt 4.5 installed to build the project.
b) The translucent window’s type should be set to Qt::FramelessWindowHint.