Method 1:
It is possible to clobber your keyring passphrase and settings from the Terminal. Open a terminal (Applications > Accessories > Terminal), and run the command:
1
# rm ~/.gnome2/keyrings/login.keyring
On older systems you may need to try:
1
# rm ~/.gnome2/keyrings/default.keyring
Method 2:
The second method bypasses the Terminal and uses the graphical interface strictly. To delete your current keyring, follow the steps below:
Navigate to Applications > Accessories > Passwords and Encryption Keys
Select the far-right tab “Passwords”
Select your keyring
Right-click and attempt “Change Password” or, if that doesn’t work, select “Delete”
I used to have lrcshow-x, but it seems to be hard to install and do not cache lyrics locally. From the osdlyrics download file list, use the 0.4.0 version for Ubuntu 10.04 (Lucid). Newer versions are broken in MPRIS2 protocol handling, see here.
The configure files are located in /etc/ssh/sshd_config. The default ones are OK.
Now connect your server by command below. The -X flag enables X11 forwarding, through which a user can access the local X11 display:
1
# ssh -X <user>@<address>
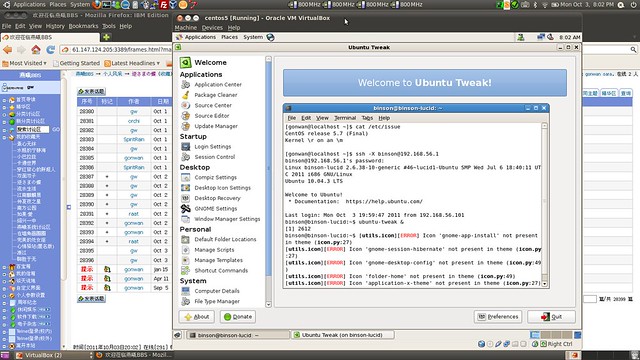
I use Ubuntu as host, and CentOS as guest in VirtualBox. The default NAT network mode does not allow you to access a guest from host. I just change the network mode to Host-only Network, and the problem is solved.
Here gives a screenshot: ubuntu-tweak is running on CentOS:
I used mencoder utility to convert my video files. But it was compiled without libfaac. So if you specify AAC encoding, an error occurs. Details and solutions can be found here. I just added the Medibuntu repository as described:
Modify fps/codec/bitrate values as you wish. The aglobal & vglobal options seem to be essential for iPod.
In order to keep video aspect after scaling, the output file should be 360×204. we use the -vf-add filter to add black band to the top and bottom of it. Other command line options, please refer to its manpage.
Lastly, install gtkpod to import your *.mp4 files.
Updated Mar 27, 2012: The above command line is for iPod Nano. For high quality H264 encoding used in iPod Touch or iPhone, run:
Web-based Distributed Authoring and Versioning (WebDAV) is a set of methods based on the Hypertext Transfer Protocol (HTTP) that facilitates collaboration between users in editing and managing documents and files stored on World Wide Web servers. WebDAV was defined in RFC 4918 by a working group of the Internet Engineering Task Force (IETF).
The WebDAV protocol makes the Web a readable and writable medium, in line with Tim Berners-Lee’s original vision. It provides a framework for users to create, change and move documents on a server (typically a web server or “web share”). The most important features of the WebDAV protocol include:
locking (“overwrite prevention”)
properties (creation, removal, and querying of information about author, modified date et cetera);
name space management (ability to copy and move Web pages within a server’s namespace)
collections (creation, removal, and listing of resources)
I used Apache to experience the WebDAV. The server was built and installed from source with:
The “prefix”, “layout”, “mpm” switch is not necessary, since these are the default values under Unix. Now modify the configure files to support WebDAV access:
1
2
3
4
5
# cd /usr/local/apache2
# sudo mkdir var uploads
# sudo chown -R daemon:daemon var uploads
# sudo bin/htdigest -c user.passwd DAV-upload user
# sudo bin/htdigest user.passwd DAV-upload admin
The “var” and “uploads” directory, the “DAV-upload” realm, “user.passwd” file, “user” and “admin” user account are referred by “conf/extra/webdav.conf”. While the “daemon” user and group are referred by “conf/httpd.conf”.
Then modify “httpd.conf” to include “webdav.conf” the apache server. It a single include directive. Now start the apache server by running:
1
# sudo bin/apachectl start
Our WebDAV directory is /uploads. So here’s the address on how to access it:
– In nautilus: dav://192.168.1.100/uploads
– In konquer: webdav://192.168.1.100/uploads
– In windows: Go to –> My Network Places –> Add a network place –> Internet or network address –> Enter (http://<user>:<password>@192.168.1.100/uploads) –> Finish!