I’m running Ubuntu 12.04 as host, with VirtualBox 4.2.22. This tutorial should cover guests including Windows XP, CentOS and Ubuntu.
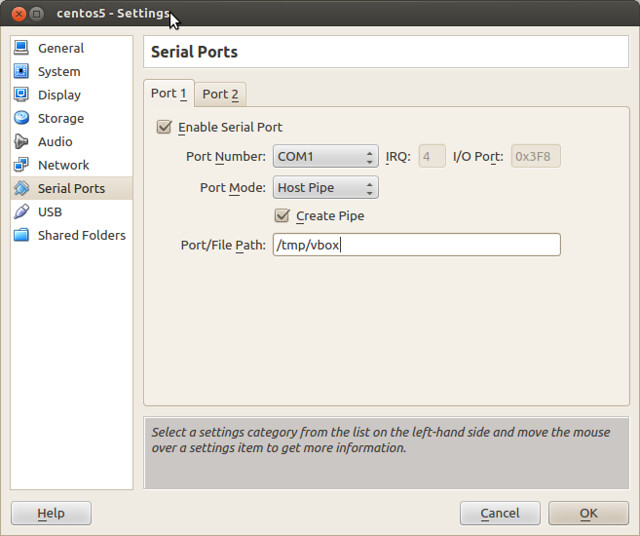
1. Settings in VirtualBox
In the settings page, Check “Enable Serial Port”, set “Port Number” to “COM1”. This is the port number in the guest. If the guest is a Linux, COM1 is shown as /dev/ttyS0, and COM2 is shown as /dev/ttyS1.
Set “Port Mode” to “Host Pipe”, check “Create Pipe” and set “Port/File Path” to “/tmp/vbox”. Seems it utilizes a named pipe. These settings work even if the host does not have a physical serial device.
2. Install minicom
|
1 2 |
# sudo apt-get install minicom # sudo minicom -s |
The second command setups minicom with an interactive menu. Select “Serial port setup”, and set “Serial Device” as “unix#/tmp/vbox”(without quotes). “Save setup as dfl” and “Exit from Minicom”.
3. Verity the serial device in guest
Now boot your Linux guest. Run the following command, and it should output something like:
|
1 2 3 4 5 6 7 |
# su # stty -F /dev/ttyS0 -a speed 9600 baud; rows 0; columns 0; line = 0; intr = ^C; quit = ^; erase = ^?; kill = ^U; eof = ^D; eol = <undef>; eol2 = <undef>; swtch = <undef>; start = ^Q; stop = ^S; susp = ^Z; rprnt = ^R; werase = ^W; lnext = ^V; flush = ^O; min = 1; time = 0; ... |
The guest here is CentOS5, and the serial device is /dev/ttyS0.
4. Communication via serial device
Start minicom on your host:
|
1 |
# minicom |
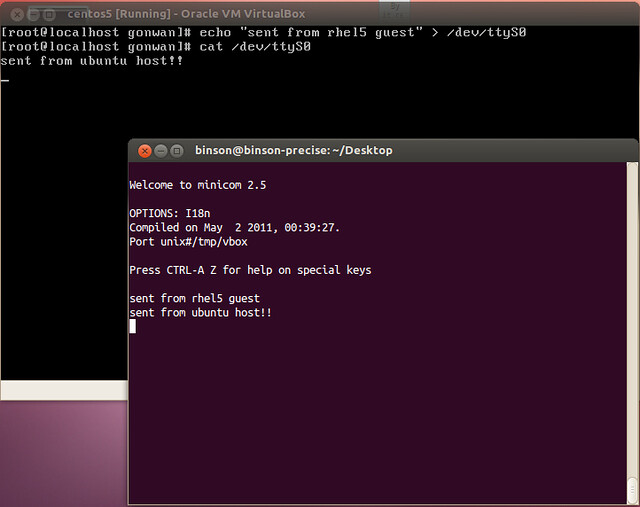
Echo something from your guest and redirect to /dev/ttyS0. You host should get the message in minicom.
|
1 |
# echo "sent from rhel5 guest" > /dev/ttyS0 |
To read from the host, cat the device in guest so that you can do the input in minicom:
|
1 |
# cat /dev/ttyS0 |
5. Kernel configuration
CentOS5 comes with grub1, /etc/grub.conf is modified directly to allow the boot information to also be sent to our serial device. The original boot entry looks like:
|
1 2 3 4 |
title CentOS (2.6.18-371.6.1.el5) root (hd0,0) kernel /boot/vmlinuz-2.6.18-371.6.1.el5 ro root=LABEL=/ initrd /boot/initrd-2.6.18-371.6.1.el5.img |
Change to add console= parameter:
|
1 2 3 4 |
title CentOS (2.6.18-371.6.1.el5) root (hd0,0) kernel /boot/vmlinuz-2.6.18-371.6.1.el5 ro root=LABEL=/ console=tty0 console=ttyS0,9600 initrd /boot/initrd-2.6.18-371.6.1.el5.img |
That’s all for CentOS 5/6. There’s no need to modify /etc/inittab or /etc/securetty file as required in ArchLinux. These OS will do it for you.
Now, reboot your guest CentOS. The boot information should now displayed in your minicom. Finally, it will provide you with a login shell.

You can verify that there’s a new line added into /etc/inittab to enable getty(8) and execute a login shell:
|
1 |
co:2345:respawn:/sbin/agetty ttyS0 9600 vt100-nav |
And ttyS0 is also added into /etc/securetty.
6. Ubuntu guest settings
Ubuntu 12.04 come with grub2. We do not modify /boot/grub/grub.cfg, we modify /etc/default/grub instead, so that the serial console parameters will remain even after you update your kernel. Open it, modify the following line to:
|
1 |
GRUB_CMDLINE_LINUX="console=tty0 console=ttyS0,115200n8" |
And update grub:
|
1 |
# sudo update-grub |
One additional step for Ubuntu, is to enable getty(8) for serial console by your own. Ubuntu uses upstart init system, we need to create a file called /etc/init/ttyS0.conf containing the following:
|
1 2 3 4 5 6 7 8 9 10 |
# ttyS0 - getty # # This service maintains a getty on ttyS0 from the point the system is # started until it is shut down again. start on stopped rc or RUNLEVEL=[12345] stop on runlevel [!12345] respawn exec /sbin/getty -L 115200 ttyS0 vt102 |
Reboot you Ubuntu guest, and the serial device should work as it is with CentOS. More info, please refer to the official wiki.
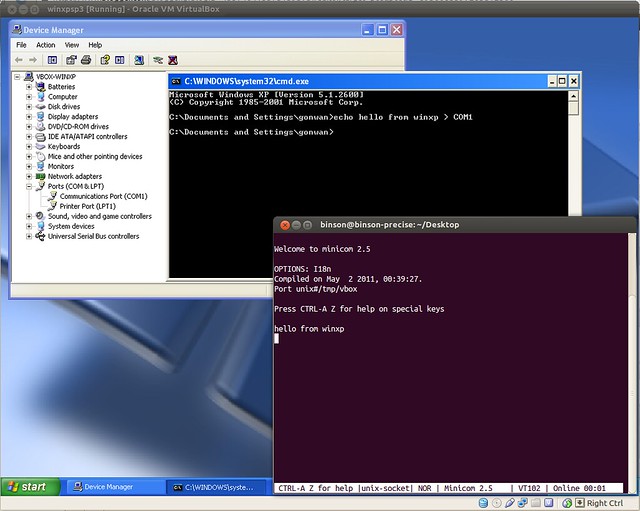
7. Windows guest settings
The serial device shows as COM1 in Windows XP as previously set. With a simple echo and redirect, our host can receive the message.
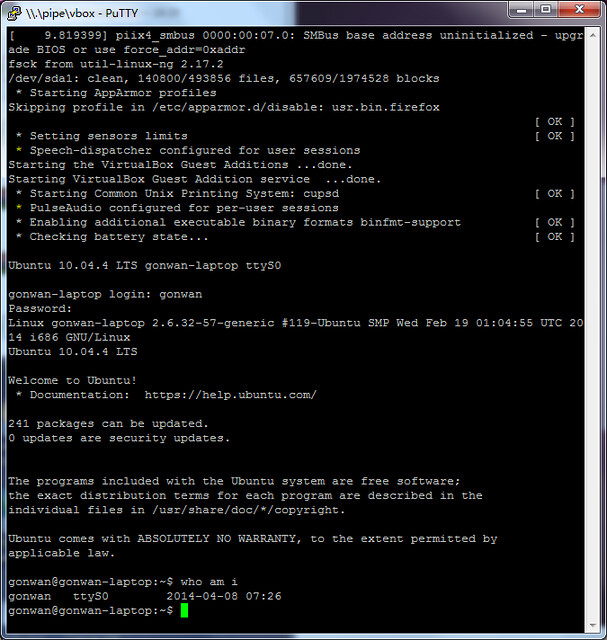
8. Windows as host
Settings of VirtualBox under Windows is almost the same as that under Linux. But we set “Port/File Path” to “\\.\pipe\vbox”, instead of “/tmp/vbox”. After the configuration of kernel and getty(8), we can use PuTTY to connect. Simply set “Connection type” to “Serial”, and “Serial line” to “\\.\pipe\vbox”.